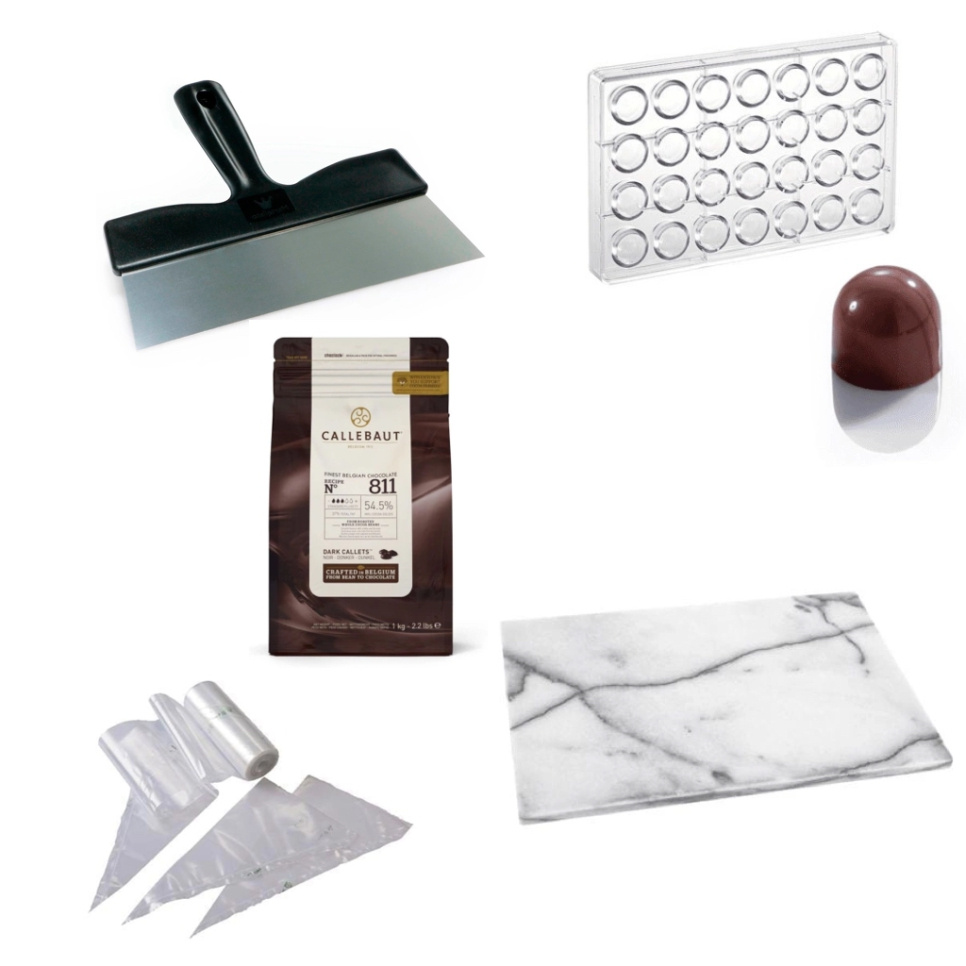

Praline pack, starter pack for praline making
Stock status
Would you like advice? Call +46 8 410 95 200
-
Information
-
Everything - or almost everything - you need to start making chocolates at home! The only thing we haven't included in the starter kit is a thermometer since many of you already have it, otherwise we can recommend the Thermastick for those looking for something simpler, but even more Thermapen ONE for a quick and reliable temperature reading and a thermometer that can be rinsed off thoroughly after all the milk chocolate mess.
In this praline starter kit, you'll find a marble tray for tempering chocolate, a scraper for tabling (smearing the chocolate on the tray to control the temperature), praline molds, couverture (chocolate) and piping bags for filling your pralines with ganache. The package includes dark chocolate, which is the easiest to work with. But they are not needed when filling chocolates either. Now you just got an extremely short description of the actual process of making pralines! For a more detailed description you can read Chokladmakarens handbok by Gustav Mabrouk.
In praline making, temperature is key and you need to temper the chocolate before you can work with it. An untempered chocolate takes a long time to set, becomes dull and muddy on the surface and melts as soon as you put your fingers on it. Tempered chocolate, on the other hand, hardens quickly, becomes glossy and fine and can be touched. The simplest way to temper chocolate is to heat it up, cool some of it down by smearing it around on the marble tray (this is called tabling), and then warm it up slightly again by mixing the cooled chocolate with the still-warm chocolate left in the bowl. Different types of chocolate require different types of temperatures and it is usually stated on the packaging which temperatures apply to the particular chocolate you are working with.
Once the chocolate is tempered, you can pour shells, i.e. fill up the molds and pour out again. There will be chocolate on the edges which will become the actual shells of the praline. When the shells have solidified, you can fill them with ganache or punch or whatever you prefer before adding the chocolate again and "curling" them, i.e. closing the lid. When the chocolates are ready, they should be pushed out of the mold firmly to loosen them. Now they are ready to eat!
If you want crazy patterns and colors and stuff like that, paint the mold itself before casting the shells. Cocoa paint can be found here.
According to our in-house praline expert Sally, you should have about 22 degrees in the room when you cast the shells for best results. For more insider tips, feel free to get in touch!
-
-
Delivery and freight
-
Read more about the brand
Reviews
0 Reviews
In order to leave a review, you must log in to your customer profile.
.This product doesn't have any reviews.
Stock status
Stock status is updated every tenth minute.